By: Tom Bahler on March 3rd, 2012
The Top 7 Problems and Solutions for Interlocking Concrete Pavers
Over the 27 years that Bahler Brothers has been in the paver installation business, we have seen pretty much anything that can go wrong. We like to think we've learned a thing or two from those experiences. One thing that we've noticed over the years is that there are a few common issues people have with their paver installations.
In this post, we've laid out the 7 most common problems that we find with interlocking concrete pavers installations in Connecticut, as well as the solutions that you can use to fix them.
See how we stack up to our competition with our Contractor Comparison Worksheet
1. The pavers are uneven and sitting at different heights.
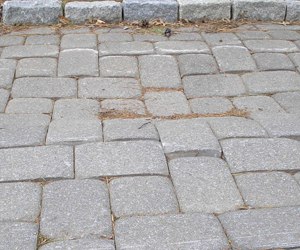
Cause: Most often when we find that pavers that are uneven, it's because the base they've been installed on is not deep enough or of an even thickness. If the existing project site has clay soils, that means that they will hold a lot more water than soils that are more sandy.
More water in the soil means that when the ground freezes it will expand more and push the pavers up. When the ground thaws out again, the pavers aren't always able to go back to the way they were, especially if sand or stone has moved under them when they were raised and out of line.
Solution: There is no easy way to solve this issue without starting over. That means taking up the entire project, removing the stone dust and using the processed gravel. It's far better not to cut corners to begin with.
2. The pavers are uneven and at different heights (part 2).
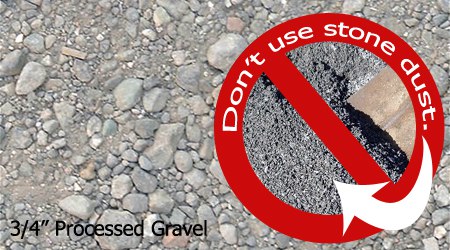
Cause: Stone dust was used for the base or as a setting bed. Stone dust is a screening by-product that we can get from some gravel pits in our area. The issue we have with stone dust is that it breaks down and becomes a fine dust when it's compacted and installed under pavers. That dust holds a lot of water and acts like a clay soil when it freezes and thaws.
Solution: We prefer to use a 3/4" processed gravel that has various sized particles along with some fines. It is great for getting a nice even compaction.
There is no easy way to solve this issue without starting over. That means taking up the entire project, removing the stone dust and using the processed gravel. It's far better not to cut corners to begin with.
3. The pavers along a fixed edge are disappearing.
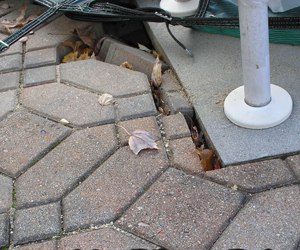
Cause: The gravel base and sand setting bed have escaped and washed out from under the pavers.
Solution: Using a filter fabric under the base and up the sides of the project excavation will prevent this from happening. It is possible to fix just this one area, without starting completely over. A piece of filter fabric can be patched in and new base can be added and the pavers reinstalled.
4. An area of pavers has settled.
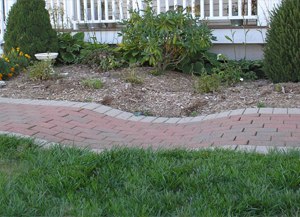
Cause: A lack of compaction is the biggest reason for an area to settle. We see this most often when we're on a project site where the house or pool is newly constructed and backfilled. The backfilled soils were most likely not compacted as they were filled in. This is also common when the ground under the pavers has been dug up and not filled in properly - like if a tree stump was dug out or if an underground utility line needed repairing.
Solution: This is fixed by pulling up the pavers, adding more gravel base making sure it is compacted in intervals as it's added. Once the base is brought back up to the proper level and pitch the bedding sand and pavers can be reinstalled.
5. The border pavers look like they're falling off.
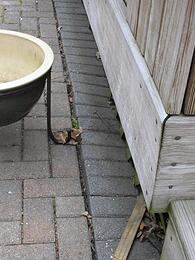
Cause: There was no edge restraint installed to hold the pattern tight together.
Solution: There are a couple of types of edge restraints that paver installers can use. The most popular one used in our area is a PVC edging that gets spiked into the gravel base that the pavers are installed on. In order to fix it, the pavers need to be pulled up, more base and sand need to be added underneath and an edge restraint needs to be installed.
6. Water is puddling on the pavers.
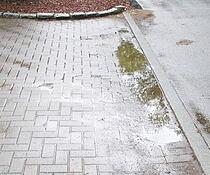
Cause: There could be 2 things that happened here. If water is puddling, the base may not have been installed at the proper pitch and may have had a slight low spot OR the base was not compacted enough and it has settled over time.
Solution: The way to fix it is to pull up the area that has settled, add more base, compact it and reinstall the pavers.
7. Pavers are uneven and tipping.
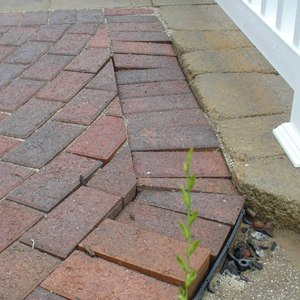
Cause: This is what happens when the pavers are not swept in with joint sand and compacted into the setting bed.
Solution: After the pavers are completely laid in the pattern of choice, the border is in place and the edging has been spiked down - a concrete sand or polymeric sand is swept into all of the joints. Next a vibratory plate compactor should be run over the entire project. More sand is then usually required to top off the joints and the project is compacted again 2 or 3 times.
These 7 situations are common when short cuts are taken while preparing an area for a paver installation. These examples may not show up right away after the project is completed, but over time they will only get worse.
Want to know exactly how to not cut corners when installing pavers? Download our contractor comparison worksheet and see what we do differently:
Related Articles:
Hardscape Cleaning and Maintenance


